Virtualization using Oracle VM VirtualBox for building two node Oracle RAC 11gR2 cluster based on Solaris 10 x86-64
Virtualization using Oracle VM VirtualBox for building two node Oracle RAC 11gR2 cluster based on Solaris 10 x86-64
In the article you will have a look at how to use some Oracle VirtualBox features to build two node Oracle 11gR RAC system on Solaris 10 x86-64. An overview to Oracle Virtualization solutions can be seen here. You will configure Solaris VM and install Oracle GI, Oracle RDBMS and will create a database. You will see how to fix some problems that were encountered.
The following software will be used:
- Oracle 11gR2 for Solaris (x86-64). Download from here.
- Oracle Solaris (x86-64). Download from here.
-
Oracle VM VirtualBox 4.0.6. Download from here.
There will be two virtual machines sol1 and sol2, each of them will be configured with
- 4GB RAM
- 160GB bootable disk
- NIC – NAT: for access to Internet
- NIC – bridged for public interface in RAC with address 192.168.2.21/22 (first IP 192.168.2.21 on sol1 and second IP 192.168.2.22 on node sol2). These are public interface in RAC.
- NIC – bridged for private interface in RAC with address 10.10.10.21/22 (first IP 10.10.10.21 on sol1 and second IP 10.10.10.22 on node sol2). These are private interface in RAC.
- NIC – Host Only : for FTP/SSH/telnet/SCP access from the host OS to the guest OS. (first IP 192.168.56.51 on sol1 and second IP 192.168.56.51on node sol2).
- 5 10GB attached shared disks for the ASM storage.
Note. For access to the Guest OS (Solaris) from the Host (MS Windows Vista 64) via ssh/scp/telnet/ftp.
For the host OS to be able to access the guest OS a Host Only adapter is required and the corresponding IP should be within the IP subnet of the VirtualBox Host-Only adapter. On the host (Windows in this case) we have.
Ethernet adapter VirtualBox Host-Only Network:
Connection-specific DNS Suffix . :
Description . . . . . . . . . . . : VirtualBox Host-Only Ethernet Adapter
Physical Address. . . . . . . . . : 08-00-27-00-3C-B7
DHCP Enabled. . . . . . . . . . . : No
Autoconfiguration Enabled . . . . : Yes
IPv4 Address. . . . . . . . . . . : 192.168.56.1(Preferred)
Subnet Mask . . . . . . . . . . . : 255.255.255.0
Default Gateway . . . . . . . . . :
NetBIOS over Tcpip. . . . . . . . : Enabled
Therefore, the IP, corresponding to the Host-Only NIC , inside the guest (Solaris in this case) should be within the 192.168.56.* subnet. Should the VirtualBox Host-Only adapter IP change, make sure that the IP within the guest is within the same subnet as the IP of the VirtualBox Host-Only adapter.
Examples of accessing Solaris from a cygwin on Windows.
Ssh /telnet connectivity.
bash-3.2$ uname -a
CYGWIN_NT-6.0-WOW64 userpc 1.7.5(0.225/5/3) 2010-04-12 19:07 i686 Cygwin
bash-3.2$ ssh root@192.168.56.51
Password:
Last login: Tue May 10 09:22:36 2011 from 192.168.2.101
Oracle Corporation SunOS 5.10 Generic Patch January 2005
#
#
# uname -a
SunOS sol1 5.10 Generic_142910-17 i86pc i386 i86pc
#
bash-3.2$ uname -a
CYGWIN_NT-6.0-WOW64 userpc 1.7.5(0.225/5/3) 2010-04-12 19:07 i686 Cygwin
bash-3.2$ telnet 192.168.56.51
Trying 192.168.56.51…
Connected to 192.168.56.51.
Escape character is ‘^]’.
login: oracle
Password:
Last login: Tue May 10 09:33:47 from 192.168.56.1
Oracle Corporation SunOS 5.10 Generic Patch January 2005
-bash: ulimit: open files: cannot modify limit: Not owner
-bash-3.00$ uname -a
SunOS sol1 5.10 Generic_142910-17 i86pc i386 i86pc
-bash-3.00$
FTP /scp
bash-3.2$ uname -a
CYGWIN_NT-6.0-WOW64 userpc 1.7.5(0.225/5/3) 2010-04-12 19:07 i686 Cygwin
bash-3.2$ ftp 192.168.56.51
Connected to 192.168.56.51.
220 sol1 FTP server ready.
Name (192.168.56.51:User): oracle
331 Password required for oracle.
Password:
230 User oracle logged in.
Remote system type is UNIX.
Using binary mode to transfer files.
ftp> bin
200 Type set to I.
ftp> ls
200 PORT command successful.
150 Opening ASCII mode data connection for /bin/ls.
total 26
-rw——- 1 oracle oinstall 50 May 2 19:31 .Xauthority
-rwxrwxrwx 1 oracle oinstall 2073 May 10 09:35 .bash_history
-rwxrwxrwx 1 oracle oinstall 489 May 2 21:52 .bash_profile
drwxr-xr-x
bash-3.2$ pwd
/cygdrive/e/software
bash-3.2$
bash-3.2$ scp pdksh-5.2.14-36.el5.x86_64.rpm root@192.168.56.51:/u01
Password:
pdksh-5.2.14-36.el5.x86_64.rpm 100% 205KB 205.4KB/s 00:00
bash-3.2$
First you will create the first virtual machine and configure network interfaces and install Solaris software and meet the Oracle RAC installation prerequisites. You will than attach the shared disks to the first virtual machine and prepare the shared storage. Last you will clone the boot disk of the first VM to create the second VM and plug the shared storage and change the IPs and hostname. In this article you will have role separation with two different accounts one (grid) for ASM storage management and the second (oracle) for RDBMS installation. In order to support role separation you will create additional groups for (asmadmin, asmdba, asmoper, oinstall) and ( dba. oinstall, oper).
-
Create the first VM sol1
Select New and click Next. Enter the name of the VM (Sol1) and press Next.

Select 4096 MB for the RAM of the VM and press Next to continue.

Select create a new disk for the boot disk and press Next to continue.

Select Dynamically expanding storage and press Next to continue.

Select 160GB (not 16GB) and press Next to continue. (16GB is not sufficient to install Solaris and Oracle GI and RDBMS).

Press Next to continue.

Press Finish.
This concludes the VM creation. After that select the VM click settings and add the four NIC as specified. First to be NAT, bridged, bridged and Host-Only.
Create the disks to be used as shared.
VBoxManage createhd –filename d:\vb\asm1.vdi –size 10240 –format VDI –variant Fixed
VBoxManage createhd –filename d:\vb\asm2.vdi –size 10240 –format VDI –variant Fixed
VBoxManage createhd –filename d:\vb\asm3.vdi –size 10240 –format VDI –variant Fixed
VBoxManage createhd –filename d:\vb\asm4.vdi –size 10240 –format VDI –variant Fixed
VBoxManage createhd –filename d:\vb\asm5.vdi –size 10240 –format VDI –variant Fixed
VBoxManage createhd –filename d:\vb\asm6.vdi –size 10240 –format VDI –variant Fixed
VBoxManage createhd –filename d:\vb\asm7.vdi –size 10240 –format VDI –variant Fixed
VBoxManage createhd –filename d:\vb\asm8.vdi –size 10240 –format VDI –variant Fixed
VBoxManage createhd –filename d:\vb\asm9.vdi –size 10240 –format VDI –variant Fixed
VBoxManage createhd –filename d:\vb\asm10.vdi –size 10240 –format VDI –variant Fixed
Attach the shared disks to the VM and mark them as shared. Note that for a disk to be shared it must be fixed.
VBoxManage storageattach Sol1 –storagectl “SATA Controller” –port 1 –device 0 –type hdd –medium d:\vb\asm1.vdi –mtype shareable
VBoxManage storageattach Sol1 –storagectl “SATA Controller” –port 2 –device 0 –type hdd –medium d:\vb\asm2.vdi –mtype shareable
VBoxManage storageattach Sol1 –storagectl “SATA Controller” –port 3 –device 0 –type hdd –medium d:\vb\asm3.vdi –mtype shareable
VBoxManage storageattach Sol1 –storagectl “SATA Controller” –port 4 –device 0 –type hdd –medium d:\vb\asm4.vdi –mtype shareable
VBoxManage storageattach Sol1 –storagectl “SATA Controller” –port 5 –device 0 –type hdd –medium d:\vb\asm5.vdi –mtype shareable
VBoxManage storageattach Sol1 –storagectl “SATA Controller” –port 6 –device 0 –type hdd –medium d:\vb\asm6.vdi –mtype shareable
VBoxManage storageattach Sol1 –storagectl “SATA Controller” –port 7 –device 0 –type hdd –medium d:\vb\asm7.vdi –mtype shareable
VBoxManage storageattach Sol1 –storagectl “SATA Controller” –port 8 –device 0 –type hdd –medium d:\vb\asm8.vdi –mtype shareable
VBoxManage storageattach Sol1 –storagectl “SATA Controller” –port 9 –device 0 –type hdd –medium d:\vb\asm9.vdi –mtype shareable
VBoxManage storageattach Sol1 –storagectl “SATA Controller” –port 10 –device 0 –type hdd –medium d:\vb\asm10.vdi –mtype shareable
VBoxManage modifyhd d:\vb\asm1.vdi –type shareable
VBoxManage modifyhd d:\vb\asm2.vdi –type shareable
VBoxManage modifyhd d:\vb\asm3.vdi –type shareable
VBoxManage modifyhd d:\vb\asm4.vdi –type shareable
VBoxManage modifyhd d:\vb\asm5.vdi –type shareable
VBoxManage modifyhd d:\vb\asm6.vdi –type shareable
VBoxManage modifyhd d:\vb\asm7.vdi –type shareable
VBoxManage modifyhd d:\vb\asm8.vdi –type shareable
VBoxManage modifyhd d:\vb\asm9.vdi –type shareable
VBoxManage modifyhd d:\vb\asm10.vdi –type shareable
The configuration will look like the graphical image below.

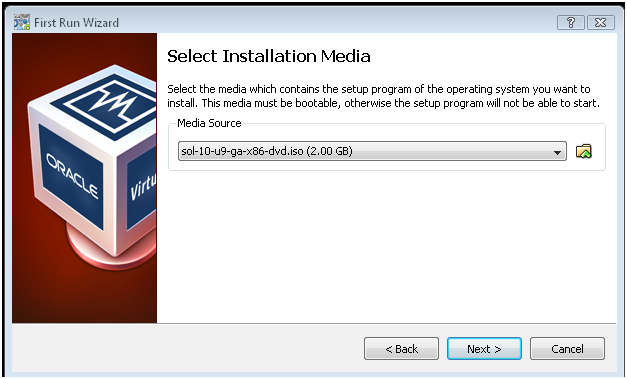
Now that the shared disks are attached and the virtual NICs are specified let’s start the VM for Solaris installation. After the VM is created and started specify the media for Solaris installation. The iso image file can be either staged in a directory on the host OS or on DVD. Start the VM and specify the installation media containing the Solaris iso. In this case the iso media is on a Windows directory and you press on the yellow folder with green arrow to select it and press Next to continue.
Press Next to continue.

Press Finish to start. Once system boots up Select Solaris and press Return.

Select 1 and press Return.

Specify the keyboard layout and press F2.

Select the language.

Press Next.

The installer presents a wizard that assists in configuration of the network, NIC, IP etc. see above. Select Networked to have the system configured and press Next to continue.

Select all Network interfaces to be configured and press Next to continue.

Select the primary interface and press Next to continue.

Select DHCP and press Next to continue.

Do not specify IPv6 and press Next to continue.

For e100g1 select manual configuration with static IP address and press Next to continue.

Enter hostname (public interface) and press Next to continue.

Enter the IP address and press Next to continue.

Enter the network mask and press Next to continue.

Enter disableIPv6 and press Next to continue.

Select the router option and press Next to continue.

Select option for a static IP for e1000g2 and press next to continue.

Enter the name of the private host name and press next to continue.

Enter the private IP and press Next to continue.

Enter the network mask and press Next to continue.

Disable IPv6 and press Next to continue.

Select None and press Next to continue.

Select to manually specify static address for e1000g3 instead of DHCP and press Next to continue.

Enter IP within the 192.168.56.* (192.168.56.52) subnet and press Next to continue.

Enter a hostname for the IP and press Next to continue.

Enter the network mask and press Next to continue.

Disable IPv6 and press next to continue.

Select routing option as selected and press Next to continue.

Deselect Kerberos and press Next to continue.

Chose the selected option and press Next to continue.

Select time zone and press Next to continue.

Select a country and press next to continue.

Review the values modify if necessary and press next to continue.

Enter root’s password and press Next to continue.

Enable it and press Next to continue.

I skipped registration and pressed Next to continue. Registration can be done at later stage.

Press Next to continue.

Review and press Confirm

Press Next to continue.

Mark the selected and press next to continue.

Select CD/DVD and press Next to continue.

Accept and press Next to continue.

Select custom and press next to continue.

Select desired localizations and press Next to continue.

Select the initial locale and press Next to continue.

Select location and press next to continue.

Select software group to install and press Next to continue. In this case I choose default packages of Entire Group plus OEM.

Select the boot disk c1t0d0 to layout the file system and we will configure the remaining 10 disks later. Press Next to continue.

Press Next after checking the disk to continue.

Press Modify.

Specify mount points for the file systems for each slice and press Apply.

Review, correct if necessary Apply and press Install Now to start the installation.

After completion and reboot we will see the screen.

- Installing Guest Additions
After login as root user, on the VirtualBox console select Devices->Install Guest Additions… The Virtual Editions media gets mounted as a virtual CD. Run the autorun.sh as root, wait to complete and reboot the server.


- Shared Folders configuration
Shared folders are configured as follows.

VirtualBox allows you to mount on the guest OS folders from the host OS. As root user create directories for each folder and use the following command to mount .
pfexec mount -F vboxfs Solaris10 /whatever-you-want
In my case I created two directories /software and /OracleVMServer and mounted the shared folders as follow.
pfexec mount -F vboxfs software /software
pfexec mount -F vboxfs OracleVMServer /OracleVMServer
To create a permanent mount points that persist a reboot add the following line to the /etc/vfstab file.
software – /software vboxfs – yes –
OracleVMServer – /OracleVMServer vboxfs – yes –
- Set up a network between host and guest OS.
In order to enable ssh as root from host to guest in guest Solaris change the file /etc/ssh/sshd_config so that parameter PermitRootLogin set no is replaced with PermitRootLogin yes.
PermitRootLogin yes
After that restart the service
svcadm restart svc:/network/ssh:default
Note. For access to the Guest OS ( Solaris) from the Host (Windows) via ssh/scp/telnet/ftp.
For the host OS to be able to access the guest OS a Host Only adapter is required and the corresponding IP should be within the IP subnet of the VirtualBox Host-Only adapter. Issuimg ipconfig on the host Windows we will have something like output below. Note the 192.168.56.1. This will determine the subnet for the guest to be accessed.
Ethernet adapter VirtualBox Host-Only Network:
Connection-specific DNS Suffix . :
Description . . . . . . . . . . . : VirtualBox Host-Only Ethernet Adapter
Physical Address. . . . . . . . . : 08-00-27-00-3C-B7
DHCP Enabled. . . . . . . . . . . : No
Autoconfiguration Enabled . . . . : Yes
IPv4 Address. . . . . . . . . . . : 192.168.56.1(Preferred)
Subnet Mask . . . . . . . . . . . : 255.255.255.0
Default Gateway . . . . . . . . . :
NetBIOS over Tcpip. . . . . . . . : Enabled
Therefore, the IP, corresponding to the Host-Only NIC , inside the guest (Solaris in this case) should be within the 192.168.56.* subnet. Should the VirtualBox Host-Only adapter IP change make, sure that the IP within the guest is within the same subnet as the IP of the VirtualBox Host-Only adapter.
Examples of accessing from a cygwin on Windows to Solaris
Ssh /telnet connectivity.
bash-3.2$ uname -a
CYGWIN_NT-6.0-WOW64 userpc 1.7.5(0.225/5/3) 2010-04-12 19:07 i686 Cygwin
bash-3.2$ ssh root@192.168.56.51
Password:
Last login: Tue May 10 09:22:36 2011 from 192.168.2.101
Oracle Corporation SunOS 5.10 Generic Patch January 2005
#
#
# uname -a
SunOS sol1 5.10 Generic_142910-17 i86pc i386 i86pc
#
bash-3.2$ uname -a
CYGWIN_NT-6.0-WOW64 userpc 1.7.5(0.225/5/3) 2010-04-12 19:07 i686 Cygwin
bash-3.2$ telnet 192.168.56.51
Trying 192.168.56.51…
Connected to 192.168.56.51.
Escape character is ‘^]’.
login: oracle
Password:
Last login: Tue May 10 09:33:47 from 192.168.56.1
Oracle Corporation SunOS 5.10 Generic Patch January 2005
-bash: ulimit: open files: cannot modify limit: Not owner
-bash-3.00$ uname -a
SunOS sol1 5.10 Generic_142910-17 i86pc i386 i86pc
-bash-3.00$
FTP /scp
bash-3.2$ uname -a
CYGWIN_NT-6.0-WOW64 userpc 1.7.5(0.225/5/3) 2010-04-12 19:07 i686 Cygwin
bash-3.2$ ftp 192.168.56.51
Connected to 192.168.56.51.
220 sol1 FTP server ready.
Name (192.168.56.51:User): oracle
331 Password required for oracle.
Password:
230 User oracle logged in.
Remote system type is UNIX.
Using binary mode to transfer files.
ftp> bin
200 Type set to I.
ftp> ls
200 PORT command successful.
150 Opening ASCII mode data connection for /bin/ls.
total 26
-rw——- 1 oracle oinstall 50 May 2 19:31 .Xauthority
-rwxrwxrwx 1 oracle oinstall 2073 May 10 09:35 .bash_history
-rwxrwxrwx 1 oracle oinstall 489 May 2 21:52 .bash_profile
drwxr-xr-x
bash-3.2$ pwd
/cygdrive/e/software
bash-3.2$
bash-3.2$ scp pdksh-5.2.14-36.el5.x86_64.rpm root@192.168.56.51:/u01
Password:
pdksh-5.2.14-36.el5.x86_64.rpm 100% 205KB 205.4KB/s 00:00
bash-3.2$
- Setting the shared storage for ASM
There are ten shared disks attached to the Solaris VM. Those disks are visible as c1t1d0, c1t2d0,c1t3d0,c1t4d0, c1t5d0, c1t6d0, c1t7d0, c1t8d0, c1t9d0 and c1t10d0. You need to format and prepare them for the ASM with privileges (0660) and ownership (grid:asmadmin). Each disk is formatted and a partition is created starting from 1 cylinder. The available disks can be seen using the format command as shown below. Than for each disk you invoke fdisk and accept Solaris as default type of partition. Then you partition with partition command and select 0 partition to start from first cylinder and enter size 9.95GB (remember 10GB was the original size) and print the partition table. You repeat the procedure for all ten shared disks. The flow of commands is as follow.
bash-3.00# format
Searching for disks…done
AVAILABLE DISK SELECTIONS:
0. c1t0d0 <DEFAULT cyl 20883 alt 2 hd 255 sec 63>
/pci@0,0/pci8086,2829@d/disk@0,0
1. c1t1d0 <DEFAULT cyl 1303 alt 2 hd 255 sec 63>
/pci@0,0/pci8086,2829@d/disk@1,0
2. c1t2d0 <DEFAULT cyl 1303 alt 2 hd 255 sec 63>
/pci@0,0/pci8086,2829@d/disk@2,0
3. c1t3d0 <DEFAULT cyl 1303 alt 2 hd 255 sec 63>
/pci@0,0/pci8086,2829@d/disk@3,0
4. c1t4d0 <DEFAULT cyl 1303 alt 2 hd 255 sec 63>
/pci@0,0/pci8086,2829@d/disk@4,0
5. c1t5d0 <DEFAULT cyl 1303 alt 2 hd 255 sec 63>
/pci@0,0/pci8086,2829@d/disk@5,0
6. c1t6d0 <DEFAULT cyl 1302 alt 2 hd 255 sec 63>
/pci@0,0/pci8086,2829@d/disk@6,0
7. c1t7d0 <DEFAULT cyl 1302 alt 2 hd 255 sec 63>
/pci@0,0/pci8086,2829@d/disk@7,0
8. c1t8d0 <DEFAULT cyl 1302 alt 2 hd 255 sec 63>
/pci@0,0/pci8086,2829@d/disk@8,0
9. c1t9d0 <DEFAULT cyl 1302 alt 2 hd 255 sec 63>
/pci@0,0/pci8086,2829@d/disk@9,0
10. c1t10d0 <DEFAULT cyl 1302 alt 2 hd 255 sec 63>
/pci@0,0/pci8086,2829@d/disk@a,0
Specify disk (enter its number): 4
selecting c1t4d0
[disk formatted]
FORMAT MENU:
disk – select a disk
type – select (define) a disk type
partition – select (define) a partition table
current – describe the current disk
format – format and analyze the disk
fdisk – run the fdisk program
repair – repair a defective sector
label – write label to the disk
analyze – surface analysis
defect – defect list management
backup – search for backup labels
verify – read and display labels
save – save new disk/partition definitions
inquiry – show vendor, product and revision
volname – set 8-character volume name
!<cmd> – execute <cmd>, then return
quit
format> format>
format> fdisk
No fdisk table exists. The default partition for the disk is:
a 100% “SOLARIS System” partition
Type “y” to accept the default partition, otherwise type “n” to edit the
partition table.
y
format>
format> partition
PARTITION MENU:
0 – change `0′ partition
1 – change `1′ partition
2 – change `2′ partition
3 – change `3′ partition
4 – change `4′ partition
5 – change `5′ partition
6 – change `6′ partition
7 – change `7′ partition
select – select a predefined table
modify – modify a predefined partition table
name – name the current table
print – display the current table
label – write partition map and label to the disk
!<cmd> – execute <cmd>, then return
quit
partition> 0
Part Tag Flag Cylinders Size Blocks
0 unassigned wm 0 0 (0/0/0) 0
Enter partition id tag[unassigned]:
Enter partition permission flags[wm]:
Enter new starting cyl[0]: 1
Enter partition size[0b, 0c, 1e, 0.00mb, 0.00gb]: 9.95g
partition> print
Current partition table (unnamed):
Total disk cylinders available: 1302 + 2 (reserved cylinders)
Part Tag Flag Cylinders Size Blocks
0 unassigned wm 1 – 1299 9.95GB (1299/0/0) 20868435
1 unassigned wm 0 0 (0/0/0) 0
2 backup wu 0 – 1301 9.97GB (1302/0/0) 20916630
3 unassigned wm 0 0 (0/0/0) 0
4 unassigned wm 0 0 (0/0/0) 0
5 unassigned wm 0 0 (0/0/0) 0
6 unassigned wm 0 0 (0/0/0) 0
7 unassigned wm 0 0 (0/0/0) 0
8 boot wu 0 – 0 7.84MB (1/0/0) 16065
9 unassigned wm 0 0 (0/0/0) 0
partition>
partition> label
Ready to label disk, continue? y
partition>quit
In this case the whole disk c1t4d0 was partitioned as one partition and made available for ASM. Repeat the same steps for all remaining nine shared disks. Since slice 0 was used you need to make those available to ASM by setting the permissions and ownership as show below.
chown grid:asmadmin /dev/rdsk/c1t1d0s0
chmod 660 /dev/rdsk/c1t1d0s0
chown grid:asmadmin /dev/rdsk/c1t10d0s0
chmod 660 /dev/rdsk/c1t10d0s0
chown grid:asmadmin /dev/rdsk/c1t9d0s0
chmod 660 /dev/rdsk/c1t9d0s0
chown grid:asmadmin /dev/rdsk/c1t8d0s0
chmod 660 /dev/rdsk/c1t8d0s0
chown grid:asmadmin /dev/rdsk/c1t7d0s0
chmod 660 /dev/rdsk/c1t7d0s0
chown grid:asmadmin /dev/rdsk/c1t6d0s0
chmod 660 /dev/rdsk/c1t6d0s0
chown grid:asmadmin /dev/rdsk/c1t5d0s0
chmod 660 /dev/rdsk/c1t5d0s0
chown grid:asmadmin /dev/rdsk/c1t4d0s0
chmod 660 /dev/rdsk/c1t4d0s0
chown grid:asmadmin /dev/rdsk/c1t3d0s0
chmod 660 /dev/rdsk/c1t3d0s0
chown grid:asmadmin /dev/rdsk/c1t2d0s0
chmod 660 /dev/rdsk/c1t2d0s0
For more information refer to Oracle documentation here.
-
Creating Solaris users and groups
Oracle starting with 11gR2 is enabling a role separation when installing Oracle GI and Oracle RDBMS. The idea is Oracle GI will have a user grid as ASM administrator and Oracle RDBMS will have a user oracle as RDBMS administrator. Both users share oinstall group so that both Oracle GI and Oracle RDBMS share the same inventory. However each admin has different groups. The grid user is a member of asmadmin, asmdba, asmoper and the primary group is oinstall. The oracle user is a member of dba, asmdba and oper and the primary group is oinstall. Users and groups are created with the following commands.
groupadd -g 1000 oinstall
groupadd -g 1020 asmadmin
groupadd -g 1021 asmdba
groupadd -g 1022 asmoper
groupadd -g 1031 dba
groupadd -g 1032 oper
useradd -u 1100 -g oinstall -G asmoper,asmadmin,asmdba grid
useradd -u 1101 -g oinstall -G oper,dba,asmdba oracle
User grid and user oracle separate the responsibilities between storage administrator and Oracle DBA.
-
Create the directories for ORACLE_BASE and ORACLE_HOME for Oracle GI and Oracle RDBMS
mkdir -p /u01/app/11.2.0/grid
mkdir -p /u01/app/grid
chown -R grid:oinstall /u01
mkdir -p /u01/app/oracle
chown oracle:oinstall /u01/app/oracle
chmod -R 775 /u01
mkdir -p /u01/app/11.2.0/grid
chown grid:oinstall /u01/app/11.2.0/grid
chmod -R 775 /u01/app/11.2.0/grid
mkdir -p /u01/app/oracle/product/11.2.0/db_1
chown -R oracle:oinstall /u01/app/oracle
chmod -R 775 /u01/app/oracle
-
Setup Solaris kernel parameters.
Create two projects for Oracle GI and Oracle RDBMS users respectively. Set the share memory parameters.
projadd -U grid -K “project.max-shm-memory=(priv,6g,deny)” user.grid
projmod -sK “project.max-sem-nsems=(priv,512,deny)” user.grid
projmod -sK “project.max-sem-ids=(priv,128,deny)” user.grid
projmod -sK “project.max-shm-ids=(priv,128,deny)” user.grid
projmod -sK “project.max-shm-memory=(priv,6g,deny)” user.grid
projadd -U oracle -K “project.max-shm-memory=(priv,6g,deny)” user.oracle
projmod -sK “project.max-sem-nsems=(priv,512,deny)” user.oracle
projmod -sK “project.max-sem-ids=(priv,128,deny)” user.oracle
projmod -sK “project.max-shm-ids=(priv,128,deny)” user.oracle
projmod -sK “project.max-shm-memory=(priv,6g,deny)” user.oracle
/usr/sbin/projmod -sK “process.max-file-descriptor=(priv,65536,deny)” user.oracle
/usr/sbin/projmod -sK “process.max-file-descriptor=(priv,65536,deny)” user.grid
If the max file descriptors are not set properly there will be errors starting OUI. You see it later on.
Set the TCP and UDP kernel parameters
/usr/sbin/ndd -set /dev/tcp tcp_smallest_anon_port 9000
/usr/sbin/ndd -set /dev/tcp tcp_largest_anon_port 65500
/usr/sbin/ndd -set /dev/udp udp_smallest_anon_port 9000
/usr/sbin/ndd -set /dev/udp udp_largest_anon_port 65500
Put in /etc/inittab the following lines for the TCP and UDP parameters to persist across reboot.
tm::sysinit:/usr/sbin/ndd -set /dev/tcp tcp_smallest_anon_port 9000 > /dev/console
tm::sysinit:/usr/sbin/ndd -set /dev/tcp tcp_largest_anon_port 65500 > /dev/console
tm::sysinit:/usr/sbin/ndd -set /dev/udp udp_smallest_anon_port 9000 > /dev/console
tm::sysinit:/usr/sbin/ndd -set /dev/udp udp_largest_anon_port 65500 > /dev/console
- Automatic SSH configuration
Oracle recommends using OUI to setup ssh user equivalence where users can connect across the node of the cluster without a password. To avoid errors while attaching $OH when the remote node closes a connection prematurely set in /etc/ssh/sshd_config file LoginGraceTime 0. After changing the file restart ssh service.
svcadm restart ssh
-
Enable Core file creation
Make sure that Core Dumps are enabled. To check if core dumps are enabled use coreadm command as follows.
bash-3.00# coreadm
global core file pattern:
global core file content: default
init core file pattern: core
init core file content: default
global core dumps: disabled
per-process core dumps: enabled
global setid core dumps: disabled
per-process setid core dumps: disabled
global core dump logging: disabled
bash-3.00#
As root user make the following directory. And enable core dumps as show below.
mkdir -p /var/cores
coreadm -g /var/cores/%f.%n.%p.%t.core -e global -e global-setid -e log -d process -d proc-setid
Verify the result.
bash-3.00# coreadm
global core file pattern: /var/cores/%f.%n.%p.%t.core
global core file content: default
init core file pattern: core
init core file content: default
global core dumps: enabled
per-process core dumps: disabled
global setid core dumps: enabled
per-process setid core dumps: disabled
global core dump logging: enabled
bash-3.00#
- Network Time protocol Settings
You have two options for time synchronization: an operating system configured network time protocol (NTP), or Oracle Cluster Time Synchronization Service. Oracle Cluster Time Synchronization Service is designed for organizations whose cluster servers are unable to access NTP services. If you use NTP, then the Oracle Cluster Time Synchronization daemon (ctssd) starts up in observer mode. If you do not have NTP daemons, then ctssd starts up in active mode and synchronizes time among cluster members without contacting an external time server. So there are two options
- Disable NTP and rely entirely on CTSS:
As root execute the command below:
/usr/sbin/svcadm disable ntp
- Configure NTP and use it together with CTSS:
As root edit the /etc/inet/ntp.conf file to add “slewalways yes” and “disable pll” to the file. After you make these changes, restart xntpd using the command
/usr/sbin/svcadm restart ntp.
NTP is disabled in the installation reflected in article.
- Create the following profiles
For user grid
umask 022
ORACLE_BASE=/u01/app/grid
ORACLE_HOME=/u01/app/11.2.0/grid
ORACLE_SID=+ASM1
LD_LIBRARY_PATH=$ORACLE_HOME/lib
PATH=$PATH:/usr/local/bin:/usr/sbin:/usr/bin:/usr/openwin/bin:/usr/ucb:$ORACLE_H OME/bin
export ORACLE_BASE ORACLE_HOME ORACLE_SID LD_LIBRARY_PATH PATH
TEMP=/tmp
TMPDIR=/tmp
export TEMP TMPDIR
ulimit -t unlimited
ulimit -f unlimited
ulimit -d unlimited
ulimit -s unlimited
ulimit -v unlimited
if [ -t 0 ]; then
stty intr ^C
fi
For user oracle
umask 022
ORACLE_BASE=/u01/app/oracle
ORACLE_HOME=/u01/app/oracle/product/11.2.0/db_1
ORACLE_SID=D11G
LD_LIBRARY_PATH=$ORACLE_HOME/lib
PATH=$PATH:/usr/local/bin:/usr/sbin:/usr/bin:/usr/openwin/bin:/usr/ucb:$ORACLE_HOME/bin
export ORACLE_BASE ORACLE_HOME ORACLE_SID LD_LIBRARY_PATH PATH
TEMP=/tmp
TMPDIR=/tmp
export TEMP TMPDIR
ulimit -t unlimited
ulimit -f unlimited
ulimit -d unlimited
ulimit -s unlimited
ulimit -v unlimited
if [ -t 0 ]; then
stty intr ^C
fi
- Set up file descriptors
Edit the /etc/system to add the following parameters.
# Hard limit on file descriptors for single process
set rlim_fd_max = 65536
# Soft limit on the file descriptors for a single process
set rlim_fd_cur = 65536
- Require packages and patches
For Solaris 10 x86-64 the following packages and patches are required.
SUNWarc
SUNWbtool
SUNWcsl
SUNWhea
SUNWlibC
SUNWlibm
SUNWlibms
SUNWsprot
SUNWtoo
SUNWi1of (ISO8859-1)
SUNWi1cs (ISO8859-15)
SUNWi15cs
SUNWxwfnt
119961-05 or later
119964-14 or later
120754-06 or later
139556-08 or later
139575-03 or later
141415-04 or later
141445-09 or later [11.2.0.2]
The ISO image can be mounted as follows.
mount -F hsfs -o ro ‘lofiadm -a /<full path>/sol-10-u9-ga-x86-dvd.iso’ /mnt
Package verification can be done as follows.
pkginfo -i SUNWarc SUNWbtool SUNWhea SUNWlibC SUNWlibm SUNWlibms SUNW
> SUNWtoo SUNWi1of SUNWi1cs SUNWi15cs SUNWxwfnt SUNWcsl
system SUNWarc Lint Libraries (usr)
system SUNWbtool CCS tools bundled with SunOS
system SUNWcsl Core Solaris, (Shared Libs)
system SUNWhea SunOS Header Files
system SUNWi15cs X11 ISO8859-15 Codeset Support
system SUNWi1cs X11 ISO8859-1 Codeset Support
system SUNWi1of ISO-8859-1 (Latin-1) Optional Fonts
system SUNWlibC Sun Workshop Compilers Bundled libC
system SUNWlibm Math & Microtasking Library Headers & Lint Files (Usr)
system SUNWlibms Math & Microtasking Libraries (Usr)
system SUNWsprot Solaris Bundled tools
system SUNWtoo Programming Tools
system SUNWxwfnt X Window System platform required fonts
bash-3.00#
Use pkgadd to add missing packages if required.
- Modify /etc/hosts file to have entries for the public, private and scan addresses similarly to the output below.
bash-3.00# cat /etc/hosts
#
# Internet host table
#
::1 localhost
127.0.0.1 localhost
192.168.2.21 sol1 sol1.gj.com
192.168.2.31 sol1-vip sol1-vip.gj.com
192.168.2.32 sol2-vip sol2-vip.gj.com
192.168.2.51 scan-sol scan-sol.gj.com
10.10.10.21 sol1-priv sol1-priv.gj.com
10.10.10.22 sol2-priv sol2-priv.gj.com
192.168.56.51 sol1-exp sol1-exp.gj.com
192.168.56.52 sol2-exp sol2-exp.gj.com
The IP addresses are as follows:
10.0.2.15 unknown # Added by DHCP
bash-3.00# ifconfig -a
lo0: flags=2001000849<UP,LOOPBACK,RUNNING,MULTICAST,IPv4,VIRTUAL> mtu 8232 index 1
inet 127.0.0.1 netmask ff000000
e1000g0: flags=1004843<UP,BROADCAST,RUNNING,MULTICAST,DHCP,IPv4> mtu 1500 index 2
inet 10.0.2.15 netmask ffffff00 broadcast 10.0.2.255
ether 8:0:27:55:88:6e
e1000g1: flags=1000843<UP,BROADCAST,RUNNING,MULTICAST,IPv4> mtu 1500 index 3
inet 192.168.2.21 netmask ffffff00 broadcast 192.168.2.255
ether 8:0:27:1f:86:d8
e1000g2: flags=1000843<UP,BROADCAST,RUNNING,MULTICAST,IPv4> mtu 1500 index 4
inet 10.10.10.21 netmask ffffff00 broadcast 10.10.10.255
ether 8:0:27:fe:cf:a1
e1000g3: flags=1000843<UP,BROADCAST,RUNNING,MULTICAST,IPv4> mtu 1500 index 5
inet 192.168.56.51 netmask ffffff00 broadcast 192.168.56.255
ether 8:0:27:9:c0:56
bash-3.00#
-
Clone the boot disk of Sol1 VM to create a second VM corresponding to the second node.
d:\VB>vboxmanage clonehd solaris_1.vdi solaris_2.cdi
0%…10%…20%…30%…40%…50%…60%…70%…80%…90%…100%
Clone hard disk created in format ‘VDI’. UUID: 3a3bf230-291b-4515-8da5-73b0ce0b3
1be
Create a second VM called Sol2 with the same resource as Sol1 but specify the cloned disk as a bootable disk. Attach the shared disks to the second VM using commands as described below.
VBoxManage storageattach Sol2 –storagectl “SATA Controller” –port 1 –device 0 –type hdd –medium d:\vb\asm1.vdi –mtype shareable
VBoxManage storageattach Sol2 –storagectl “SATA Controller” –port 2 –device 0 –type hdd –medium d:\vb\asm2.vdi –mtype shareable
VBoxManage storageattach Sol2 –storagectl “SATA Controller” –port 3 –device 0 –type hdd –medium d:\vb\asm3.vdi –mtype shareable
VBoxManage storageattach Sol2 –storagectl “SATA Controller” –port 4 –device 0 –type hdd –medium d:\vb\asm4.vdi –mtype shareable
VBoxManage storageattach Sol2 –storagectl “SATA Controller” –port 5 –device 0 –type hdd –medium d:\vb\asm5.vdi –mtype shareable
VBoxManage storageattach Sol2 –storagectl “SATA Controller” –port 6 –device 0 –type hdd –medium d:\vb\asm6.vdi –mtype shareable
VBoxManage storageattach Sol2 –storagectl “SATA Controller” –port 7 –device 0 –type hdd –medium d:\vb\asm7.vdi –mtype shareable
VBoxManage storageattach Sol2 –storagectl “SATA Controller” –port 8 –device 0 –type hdd –medium d:\vb\asm8.vdi –mtype shareable
VBoxManage storageattach Sol2 –storagectl “SATA Controller” –port 9 –device 0 –type hdd –medium d:\vb\asm9.vdi –mtype shareable
VBoxManage storageattach Sol2 –storagectl “SATA Controller” –port 10 –device 0 –type hdd –medium d:\vb\asm10.vdi –mtype shareable
VBoxManage modifyhd d:\vb\asm1.vdi –type shareable
VBoxManage modifyhd d:\vb\asm2.vdi –type shareable
VBoxManage modifyhd d:\vb\asm3.vdi –type shareable
VBoxManage modifyhd d:\vb\asm4.vdi –type shareable
VBoxManage modifyhd d:\vb\asm5.vdi –type shareable
VBoxManage modifyhd d:\vb\asm6.vdi –type shareable
VBoxManage modifyhd d:\vb\asm7.vdi –type shareable
VBoxManage modifyhd d:\vb\asm8.vdi –type shareable
VBoxManage modifyhd d:\vb\asm9.vdi –type shareable
VBoxManage modifyhd d:\vb\asm10.vdi –type shareable
- Modify the hostname and IPs on the cloned VM
In order to avoid collision with IP start only the second cloned VM and change the IP and hostname. Initially both machines apparently have same IPs and hostname. As root on Sol2 VM execute the following commands.
hostname sol2
ifconfig e1000g1 inet 192.168.2.22 netmask 255.255.255.0 broadcast 192.168.2.255
ifconfig e1000g2 inet 10.10.10.22 netmask 255.255.255.0 broadcast 10.10.10.255
ifconfig e1000g3 inet 192.168.56.52 netmask 255.255.255.0 broadcast 192.168.56.255
For changing the hostname modify the following files.
/etc/nodename
/etc/hosts
/etc/hostname.e1000g0
/etc/hostname.e1000g1
/etc/hostname.e1000g2
/etc/hostname.e1000g3
They should look like as follows.
bash-3.00# cat hostname.e1000g0
bash-3.00# cat hostname.e1000g1
sol2
bash-3.00# cat hostname.e1000g2
sol2-priv
bash-3.00# cat hostname.e1000g3
sol3-exp
bash-3.00#
-bash-3.00$ cat /etc/nodename
sol2
- Reboot the cloned Sol2 and fire up the Sol1
- Use OUI to setup ssh user equivalence for user grid and oracle.
- Run cluvfy to verify the prerequisites. See Annex A for the ouput.
- Start OUI for Oracle GI installation.
Initially I had set the file descriptors as follows:
projmod -s -K ‘process.max-file-descriptor=(basic,65536,deny)’ user.oracle
projmod -s -K ‘process.max-file-descriptor=(basic,65536,deny)’ user.grid
This produced the error while startingUOI
-bash-3.00$ Exception in thread “main” java.lang.NoClassDefFoundError
at java.lang.Class.forName0(Native Method)
at java.lang.Class.forName(Class.java:164)
at java.awt.Toolkit$2.run(Toolkit.java:821)
at java.security.AccessController.doPrivileged(Native Method)
at java.awt.Toolkit.getDefaultToolkit(Toolkit.java:804)
at com.jgoodies.looks.LookUtils.isLowResolution(Unknown Source)
at com.jgoodies.looks.LookUtils.<clinit>(Unknown Source)
at com.jgoodies.looks.plastic.PlasticLookAndFeel.<clinit>(PlasticLookAndFeel.java:122)
at java.lang.Class.forName0(Native Method)
at java.lang.Class.forName(Class.java:242)
at javax.swing.SwingUtilities.loadSystemClass(SwingUtilities.java:1783)
at javax.swing.UIManager.setLookAndFeel(UIManager.java:480)
at oracle.install.commons.util.Application.startup(Application.java:758)
at oracle.install.commons.flow.FlowApplication.startup(FlowApplication.java:164)
at oracle.install.commons.flow.FlowApplication.startup(FlowApplication.java:181)
at oracle.install.commons.base.driver.common.Installer.startup(Installer.java:265)
at oracle.install.ivw.crs.driver.CRSInstaller.startup(CRSInstaller.java:96)
at oracle.install.ivw.crs.driver.CRSInstaller.main(CRSInstaller.java:103)
MOS Note 11gR2 runInstaller Fails with Exception in thread “main” java.lang.NoClassDefFoundError [ID 1073073.1] shed some light.
Cause: The cause is incorrect setting of max-file-descriptor
Solution: As root, modify max-file-descriptor setting for grid user’s project. Assuming project name for grid user is group.oinstall:
/usr/sbin/projmod -sK “process.max-file-descriptor=(priv,65536,deny)” group.oinstall
The correct settings should be:
/usr/sbin/projmod -sK “process.max-file-descriptor=(priv,65536,deny)” user.oracle
/usr/sbin/projmod -sK “process.max-file-descriptor=(priv,65536,deny)” user.grid
After issuing xhost + from a root connected terminal session and setting a DISPLAY=:0 in a session logged as grid run OUI. Select and install GI for a cluster and press Next to continue.

Select Typical Installation and press Next to continue.

Enter the hostname and vip name for the second cluster.

Press Identify Network Interface to specify interfaces that are to be public and private. OK when done.

Specify the software location and password. Press Next to continue.

Select the disks for disk group DATA and press Next to continue.

Leave the default oraInventory location and press Nest to continue.

Wait for the check to complete.

Verify that everything looks fine and press Next to continue.

Review and press Finish.

Wait for the prompt to run the scripts as root to appear.

Run the scripts. The output is in Annex B.

Wait for completion. Verify that the only errors are due to the scan in /etc/hosts. Press Next to continue.

Exit.

- Oracle RDBMS installation only
Log in as oracle user. Set and export DISPLAY variable issuing export DISPLAY=:0. Run the installer. Press Next to continue.

Select the option to install RDBMS software only and press next to continue.

Select RAC installation and select all nodes. Press Next to continue.

Select language and press Next to continue.

Select Enterprise Edition and optionally select options and press Next to continue.

Select the locations and press Next to continue.

Select the groups and press Nest to continue. Make sure that you observe the role separation, that is RDBMS is with dba and oinstall and ASM is with asmadmin and oinstall..

Wait for the verification to complete.

Review and make sure that all checks are successful. Press Nest to continue.

Once comfortable press Finish.

Wait for the install to complete.

When prompted execute as root the root.sh and OK to continue.

This concludes the installation. Close to exit.

- Create a cluster database using dbca
During the creating of a database dbca failed due to the fact that oracle RDBMS instance cannot open the ASM disk while the disk group is mounted. Since the purpose of role separation is to have a Oracle GI user grid and group asmadmin totally different from Oracle RDBMS user oracle with dba group somehow Orac;e needs to be able to have access to the disk groups. After a short research in MOS a couple of Note suggested that <Oracle RDBMS Home>/bin/oracle should be owned by oracle:asmadmin. However this was not the case and was instead owned by oracle:dba which explained why RDBMS instance cannot access the disk group. I will briefly walk through the installation and focus on the errors and the proposed solution.
While logged in as oracle set DISPLAY variable and start dbca. Select create a cluster database and press Next to continue.

Select create a database and press Next to continue.

Select a template and press Next.

Specify a database name and select all nodes of the cluster and press Next to continue.

Select Configure EM and press Next to continue.

Enter password and press Next to continue.

Select storage type and storage location and press Next to continue.

Enter password for the ASM. OK and press Next to continue.

Specify FRA and/or archiving and press Next to continue.

Select sample schemas. Press Next to continue.

Select memory management option (AMM or ASMM or Manual memory management) and press Next to continue.

Click Nest.

Select Create database press Finish.

Review the summary and OK.

Dbca start creating the database.


The alert is showing
System parameters with non-default values:
“/tmp/alert_20680_1_d11g1_1.ado” 742 lines, 30153 characters
ORA-15025: could not open disk ‘/dev/rdsk/c1t1d0s0’
ORA-27041: unable to open file
Solaris-AMD64 Error: 13: Permission denied
Additional information: 9
ORA-15025: could not open disk ‘/dev/rdsk/c1t2d0s0’
ORA-27041: unable to open file
Solaris-AMD64 Error: 13: Permission denied
Additional information: 9
ORA-15025: could not open disk ‘/dev/rdsk/c1t3d0s0’
ORA-27041: unable to open file
Solaris-AMD64 Error: 13: Permission denied
Additional information: 9
ORA-15025: could not open disk ‘/dev/rdsk/c1t4d0s0’
ORA-27041: unable to open file
Solaris-AMD64 Error: 13: Permission denied
Additional information: 9
SUCCESS: diskgroup DATA was mounted
Errors in file /u01/app/oracle/diag/rdbms/d11g/d11g1/trace/d11g1_ora_13557.trc:
ORA-00200: control file could not be created
ORA-00202: control file: ‘+DATA’
ORA-15045: ASM file name ‘+DATA’ is not in reference form
ORA-17502: ksfdcre:5 Failed to create file +DATA
ORA-15081: failed to submit an I/O operation to a disk
Apparently, it is a permission issue. ASM alert does not indicate any problem. Useful MOS notes are:
Creation on 11.2 Grid Infracture with Role Separation ( ORA-15025, KFSG-00312, ORA-15081 ) [ID 1084186.1]
*** 04/12/10 04:05 am ***As per Bug 8606583, we came up with script GIHome/bin/setasmgidwrap to take care of the ASM Disk accessibility byRDBMS process with role separation issue. This script is basically setting the RDBMS’s ‘oracle’ binary to -r-xr-s–x 1 oracle asmadmin 173515991 Apr 4 10:34 /u01/app/oracle/product/11.2.0/dbhome_1/bin/oracle This script is called by 11.2 DBCA and other tools. And needs to be run manually with 11.2 DB is created manually( Bug 9181675 ).
cd /u01/app/oracle/product/11.2.0/db_1/bin
chown oracle:asmadmin oracle
–Grid Infrastructure Home Owner : grid
–Primary Group : oinstall
–Secondary Groups : asmadmin, asmdba, asmoper
–RDBMS Home Owner : oracle
–Primary Group : oinstall
–Secondary Groups : dba, oper, asmdba
In case of standalone set up, if the 11.2 Database be managed by Oracle Restart ( srvctl stop/start ), then ‘grid’ user should also be a part of ‘dba’ group.
The ASM Disks would be owned by grid:asmadmin
After setting the ownership I reran the dbca and completed successfully.

Wait for the dbca to complete.

At the end the database is up and running.
-bash-3.00$ sqlplus / as sysdba
SQL*Plus: Release 11.2.0.1.0 Production on Wed May 4 11:42:24 2011
Copyright (c) 1982, 2009, Oracle. All rights reserved.
Connected to:
Oracle Database 11g Enterprise Edition Release 11.2.0.1.0 – 64bit Production
With the Partitioning, Real Application Clusters, Automatic Storage Management, OLAP,
Data Mining and Real Application Testing options
SQL> select * from gv$instance;
INST_ID INSTANCE_NUMBER INSTANCE_NAME
———- ————— —————-
HOST_NAME
—————————————————————-
VERSION STARTUP_T STATUS PAR THREAD# ARCHIVE LOG_SWITCH_WAIT
—————– ——— ———— — ———- ——- —————
LOGINS SHU DATABASE_STATUS INSTANCE_ROLE ACTIVE_ST BLO
———- — —————– —————— ——— —
1 1 d11g1
sol1
11.2.0.1.0 04-MAY-11 OPEN YES 1 STARTED
ALLOWED NO ACTIVE PRIMARY_INSTANCE NORMAL NO
INST_ID INSTANCE_NUMBER INSTANCE_NAME
———- ————— —————-
HOST_NAME
—————————————————————-
VERSION STARTUP_T STATUS PAR THREAD# ARCHIVE LOG_SWITCH_WAIT
—————– ——— ———— — ———- ——- —————
LOGINS SHU DATABASE_STATUS INSTANCE_ROLE ACTIVE_ST BLO
———- — —————– —————— ——— —
2 2 d11g2
sol2
11.2.0.1.0 04-MAY-11 OPEN YES 2 STARTED
ALLOWED NO ACTIVE PRIMARY_INSTANCE NORMAL NO
SQL>
Annex
Annex A
GRid user
-bash-3.00$ ./runcluvfy.sh stage -pre crsinst -n sol1,sol2 -verbose
Performing pre-checks for cluster services setup
Checking node reachability…
Check: Node reachability from node “sol1”
Destination Node Reachable?
———————————— ————————
sol1 yes
sol2 yes
Result: Node reachability check passed from node “sol1”
Checking user equivalence…
Check: User equivalence for user “grid”
Node Name Comment
———————————— ————————
sol2 passed
sol1 passed
Result: User equivalence check passed for user “grid”
Checking node connectivity…
Checking hosts config file…
Node Name Status Comment
———— ———————— ————————
sol2 passed
sol1 passed
Verification of the hosts config file successful
Interface information for node “sol2”
Name IP Address Subnet Gateway Def. Gateway HW Address MTU
—— ————— ————— ————— ————— —————– ——
e1000g0 10.0.2.16 10.0.0.0 10.0.2.16 UNKNOWN 08:00:27:C8:5A:32 1500
e1000g1 192.168.2.22 192.168.2.0 192.168.2.22 UNKNOWN 08:00:27:9F:07:27 1500
e1000g2 10.10.10.22 10.10.10.0 10.10.10.22 UNKNOWN 08:00:27:F9:E9:ED 1500
Interface information for node “sol1”
Name IP Address Subnet Gateway Def. Gateway HW Address MTU
—— ————— ————— ————— ————— —————– ——
e1000g0 10.0.2.15 10.0.0.0 10.0.2.15 UNKNOWN 08:00:27:55:88:6E 1500
e1000g1 192.168.2.21 192.168.2.0 192.168.2.21 UNKNOWN 08:00:27:1F:86:D8 1500
e1000g2 10.10.10.21 10.10.10.0 10.10.10.21 UNKNOWN 08:00:27:FE:CF:A1 1500
e1000g3 192.168.56.51 192.168.56.0 192.168.56.51 UNKNOWN 08:00:27:09:C0:56 1500
Check: Node connectivity of subnet “10.0.0.0”
Source Destination Connected?
—————————— —————————— —————-
sol2:e1000g0 sol1:e1000g0 yes
Result: Node connectivity passed for subnet “10.0.0.0” with node(s) sol2,sol1
Check: TCP connectivity of subnet “10.0.0.0”
Source Destination Connected?
—————————— —————————— —————-
sol1:10.0.2.15 sol2:10.0.2.16 passed
Result: TCP connectivity check passed for subnet “10.0.0.0”
Check: Node connectivity of subnet “192.168.2.0”
Source Destination Connected?
—————————— —————————— —————-
sol2:e1000g1 sol1:e1000g1 yes
Result: Node connectivity passed for subnet “192.168.2.0” with node(s) sol2,sol1
Check: TCP connectivity of subnet “192.168.2.0”
Source Destination Connected?
—————————— —————————— —————-
sol1:192.168.2.21 sol2:192.168.2.22 passed
Result: TCP connectivity check passed for subnet “192.168.2.0”
Check: Node connectivity of subnet “10.10.10.0”
Source Destination Connected?
—————————— —————————— —————-
sol2:e1000g2 sol1:e1000g2 yes
Result: Node connectivity passed for subnet “10.10.10.0” with node(s) sol2,sol1
Check: TCP connectivity of subnet “10.10.10.0”
Source Destination Connected?
—————————— —————————— —————-
sol1:10.10.10.21 sol2:10.10.10.22 passed
Result: TCP connectivity check passed for subnet “10.10.10.0”
Check: Node connectivity of subnet “192.168.56.0”
Result: Node connectivity passed for subnet “192.168.56.0” with node(s) sol1
Check: TCP connectivity of subnet “192.168.56.0”
Result: TCP connectivity check passed for subnet “192.168.56.0”
Interfaces found on subnet “10.0.0.0” that are likely candidates for a private interconnect are:
sol2 e1000g0:10.0.2.16
sol1 e1000g0:10.0.2.15
Interfaces found on subnet “192.168.2.0” that are likely candidates for a private interconnect a re:
sol2 e1000g1:192.168.2.22
sol1 e1000g1:192.168.2.21
Interfaces found on subnet “10.10.10.0” that are likely candidates for a private interconnect ar e:
sol2 e1000g2:10.10.10.22
sol1 e1000g2:10.10.10.21
WARNING:
Could not find a suitable set of interfaces for VIPs
Result: Node connectivity check passed
Check: Total memory
Node Name Available Required Comment
———— ———————— ———————— ———-
sol2 4GB (4194304.0KB) 1.5GB (1572864.0KB) passed
sol1 4GB (4194304.0KB) 1.5GB (1572864.0KB) passed
Result: Total memory check passed
Check: Available memory
Node Name Available Required Comment
———— ———————— ———————— ———-
sol2 3.0471GB (3195104.0KB) 50MB (51200.0KB) passed
sol1 2.7565GB (2890416.0KB) 50MB (51200.0KB) passed
Result: Available memory check passed
Check: Swap space
Node Name Available Required Comment
———— ———————— ———————— ———-
sol2 4.0064GB (4200992.0KB) 4GB (4194304.0KB) passed
sol1 4.0064GB (4200992.0KB) 4GB (4194304.0KB) passed
Result: Swap space check passed
Check: Free disk space for “sol2:/var/tmp/”
Path Node Name Mount point Available Required Comment
—————- ———— ———— ———— ———— ————
/var/tmp/ sol2 / 5.3015GB 1GB passed
Result: Free disk space check passed for “sol2:/var/tmp/”
Check: Free disk space for “sol1:/var/tmp/”
Path Node Name Mount point Available Required Comment
—————- ———— ———— ———— ———— ————
/var/tmp/ sol1 / 5.3016GB 1GB passed
Result: Free disk space check passed for “sol1:/var/tmp/”
Check: User existence for “grid”
Node Name Status Comment
———— ———————— ————————
sol2 exists(1100) passed
sol1 exists(1100) passed
Checking for multiple users with UID value 1100
Result: Check for multiple users with UID value 1100 passed
Result: User existence check passed for “grid”
Check: Group existence for “oinstall”
Node Name Status Comment
———— ———————— ————————
sol2 exists passed
sol1 exists passed
Result: Group existence check passed for “oinstall”
Check: Group existence for “dba”
Node Name Status Comment
———— ———————— ————————
sol2 exists passed
sol1 exists passed
Result: Group existence check passed for “dba”
Check: Membership of user “grid” in group “oinstall” [as Primary]
Node Name User Exists Group Exists User in Group Primary Comment
—————- ———— ———— ———— ———— ————
sol2 yes yes yes yes passed
sol1 yes yes yes yes passed
Result: Membership check for user “grid” in group “oinstall” [as Primary] passed
Check: Membership of user “grid” in group “dba”
Node Name User Exists Group Exists User in Group Comment
—————- ———— ———— ———— —————-
sol2 yes yes no failed
sol1 yes yes no failed
Result: Membership check for user “grid” in group “dba” failed
Check: Run level
Node Name run level Required Comment
———— ———————— ———————— ———-
sol2 3 3 passed
sol1 3 3 passed
Result: Run level check passed
Check: Hard limits for “maximum open file descriptors”
Node Name Type Available Required Comment
—————- ———— ———— ———— —————-
sol2 hard 4096 65536 failed
sol1 hard 4096 65536 failed
Result: Hard limits check failed for “maximum open file descriptors”
Check: Soft limits for “maximum open file descriptors”
Node Name Type Available Required Comment
—————- ———— ———— ———— —————-
sol2 soft 4096 1024 passed
sol1 soft 4096 1024 passed
Result: Soft limits check passed for “maximum open file descriptors”
Check: Hard limits for “maximum user processes”
Node Name Type Available Required Comment
—————- ———— ———— ———— —————-
sol2 hard 29995 16384 passed
sol1 hard 29995 16384 passed
Result: Hard limits check passed for “maximum user processes”
Check: Soft limits for “maximum user processes”
Node Name Type Available Required Comment
—————- ———— ———— ———— —————-
sol2 soft 29995 2047 passed
sol1 soft 29995 2047 passed
Result: Soft limits check passed for “maximum user processes”
Check: System architecture
Node Name Available Required Comment
———— ———————— ———————— ———-
sol2 64-bit amd64 kernel modules 64-bit amd64 kernel modules passed
sol1 64-bit amd64 kernel modules 64-bit amd64 kernel modules passed
Result: System architecture check passed
Check: Kernel version
Node Name Available Required Comment
———— ———————— ———————— ———-
sol2 5.10-2010.08.11.10.15 5.10-2008.10 passed
sol1 5.10-2010.08.11.10.15 5.10-2008.10 passed
Result: Kernel version check passed
Check: Kernel parameter for “project.max-sem-ids”
Node Name Configured Required Comment
———— ———————— ———————— ———-
sol2 128 100 passed
sol1 128 100 passed
Result: Kernel parameter check passed for “project.max-sem-ids”
Check: Kernel parameter for “process.max-sem-nsems”
Node Name Configured Required Comment
———— ———————— ———————— ———-
sol2 512 256 passed
sol1 512 256 passed
Result: Kernel parameter check passed for “process.max-sem-nsems”
Check: Kernel parameter for “project.max-shm-memory”
Node Name Configured Required Comment
———— ———————— ———————— ———-
sol2 5368709120 4294967295 passed
sol1 5368709120 4294967295 passed
Result: Kernel parameter check passed for “project.max-shm-memory”
Check: Kernel parameter for “project.max-shm-ids”
Node Name Configured Required Comment
———— ———————— ———————— ———-
sol2 128 100 passed
sol1 128 100 passed
Result: Kernel parameter check passed for “project.max-shm-ids”
Check: Package existence for “SUNWarc-…”
Node Name Available Required Comment
———— ———————— ———————— ———-
sol2 SUNWarc-11.10.0-2005.01.21.16.34 SUNWarc-… passed
sol1 SUNWarc-11.10.0-2005.01.21.16.34 SUNWarc-… passed
Result: Package existence check passed for “SUNWarc-…”
Check: Package existence for “SUNWbtool-…”
Node Name Available Required Comment
———— ———————— ———————— ———-
sol2 SUNWbtool-11.10.0-2005.01.21.16.34 SUNWbtool-… passed
sol1 SUNWbtool-11.10.0-2005.01.21.16.34 SUNWbtool-… passed
Result: Package existence check passed for “SUNWbtool-…”
Check: Package existence for “SUNWhea-…”
Node Name Available Required Comment
———— ———————— ———————— ———-
sol2 SUNWhea-11.10.0-2005.01.21.16.34 SUNWhea-… passed
sol1 SUNWhea-11.10.0-2005.01.21.16.34 SUNWhea-… passed
Result: Package existence check passed for “SUNWhea-…”
Check: Package existence for “SUNWlibm-…”
Node Name Available Required Comment
———— ———————— ———————— ———-
sol2 SUNWlibm-5.10-2004.12.18 SUNWlibm-… passed
sol1 SUNWlibm-5.10-2004.12.18 SUNWlibm-… passed
Result: Package existence check passed for “SUNWlibm-…”
Check: Package existence for “SUNWlibms-…”
Node Name Available Required Comment
———— ———————— ———————— ———-
sol2 SUNWlibms-5.10-2004.11.23 SUNWlibms-… passed
sol1 SUNWlibms-5.10-2004.11.23 SUNWlibms-… passed
Result: Package existence check passed for “SUNWlibms-…”
Check: Package existence for “SUNWsprot-…”
Node Name Available Required Comment
———— ———————— ———————— ———-
sol2 SUNWsprot-5.10-2004.12.18 SUNWsprot-… passed
sol1 SUNWsprot-5.10-2004.12.18 SUNWsprot-… passed
Result: Package existence check passed for “SUNWsprot-…”
Check: Package existence for “SUNWtoo-…”
Node Name Available Required Comment
———— ———————— ———————— ———-
sol2 SUNWtoo-11.10.0-2005.01.21.16.34 SUNWtoo-… passed
sol1 SUNWtoo-11.10.0-2005.01.21.16.34 SUNWtoo-… passed
Result: Package existence check passed for “SUNWtoo-…”
Check: Package existence for “SUNWi1of-…”
Node Name Available Required Comment
———— ———————— ———————— ———-
sol2 SUNWi1of-6.6.2.7400-0.2004.12.15 SUNWi1of-… passed
sol1 SUNWi1of-6.6.2.7400-0.2004.12.15 SUNWi1of-… passed
Result: Package existence check passed for “SUNWi1of-…”
Check: Package existence for “SUNWi15cs-…”
Node Name Available Required Comment
———— ———————— ———————— ———-
sol2 SUNWi15cs-2.0-2004.10.17.15.04 SUNWi15cs-… passed
sol1 SUNWi15cs-2.0-2004.10.17.15.04 SUNWi15cs-… passed
Result: Package existence check passed for “SUNWi15cs-…”
Check: Package existence for “SUNWxwfnt-…”
Node Name Available Required Comment
———— ———————— ———————— ———-
sol2 SUNWxwfnt-6.6.2.7400-0.2004.12.15 SUNWxwfnt-… passed
sol1 SUNWxwfnt-6.6.2.7400-0.2004.12.15 SUNWxwfnt-… passed
Result: Package existence check passed for “SUNWxwfnt-…”
Check: Package existence for “SUNWlibC-…”
Node Name Available Required Comment
———— ———————— ———————— ———-
sol2 SUNWlibC-5.10-2004.12.20 SUNWlibC-… passed
sol1 SUNWlibC-5.10-2004.12.20 SUNWlibC-… passed
Result: Package existence check passed for “SUNWlibC-…”
Check: Package existence for “SUNWcsl-…”
Node Name Available Required Comment
———— ———————— ———————— ———-
sol2 SUNWcsl-11.10.0-2005.01.21.16.34 SUNWcsl-… passed
sol1 SUNWcsl-11.10.0-2005.01.21.16.34 SUNWcsl-… passed
Result: Package existence check passed for “SUNWcsl-…”
Check: Operating system patch for “Patch 139575-03”
Node Name Applied Required Comment
———— ———————— ———————— ———-
sol2 Patch 139556-08 Patch 139575-03 passed
sol1 Patch 139556-08 Patch 139575-03 passed
Result: Operating system patch check passed for “Patch 139575-03”
Check: Operating system patch for “Patch 139556-08”
Node Name Applied Required Comment
———— ———————— ———————— ———-
sol2 Patch 139556-08 Patch 139556-08 passed
sol1 Patch 139556-08 Patch 139556-08 passed
Result: Operating system patch check passed for “Patch 139556-08”
Check: Operating system patch for “Patch 137104-02”
Node Name Applied Required Comment
———— ———————— ———————— ———-
sol2 Patch 141445-09 Patch 137104-02 passed
sol1 Patch 141445-09 Patch 137104-02 passed
Result: Operating system patch check passed for “Patch 137104-02”
Check: Operating system patch for “Patch 120754-06”
Node Name Applied Required Comment
———— ———————— ———————— ———-
sol2 Patch 120754-07 Patch 120754-06 passed
sol1 Patch 120754-07 Patch 120754-06 passed
Result: Operating system patch check passed for “Patch 120754-06”
Check: Operating system patch for “Patch 119961-05”
Node Name Applied Required Comment
———— ———————— ———————— ———-
sol2 Patch 119961-06 Patch 119961-05 passed
sol1 Patch 119961-06 Patch 119961-05 passed
Result: Operating system patch check passed for “Patch 119961-05”
Check: Operating system patch for “Patch 119964-14”
Node Name Applied Required Comment
———— ———————— ———————— ———-
sol2 Patch 119964-21 Patch 119964-14 passed
sol1 Patch 119964-21 Patch 119964-14 passed
Result: Operating system patch check passed for “Patch 119964-14”
Checking for multiple users with UID value 0
Result: Check for multiple users with UID value 0 passed
Check: Current group ID
Result: Current group ID check passed
Checking Core file name pattern consistency…
Core file name pattern consistency check passed.
Checking to make sure user “grid” is not in “root” group
Node Name Status Comment
———— ———————— ————————
sol2 does not exist passed
sol1 does not exist passed
Result: User “grid” is not part of “root” group. Check passed
Check default user file creation mask
Node Name Available Required Comment
———— ———————— ———————— ———-
sol2 0022 0022 passed
sol1 0022 0022 passed
Result: Default user file creation mask check passed
Starting Clock synchronization checks using Network Time Protocol(NTP)…
NTP Configuration file check started…
Network Time Protocol(NTP) configuration file not found on any of the nodes. Oracle Cluster Time Synchronization Service(CTSS) can be used instead of NTP for time synchronization on the cluster nodes
Result: Clock synchronization check using Network Time Protocol(NTP) passed
Pre-check for cluster services setup was unsuccessful on all the nodes.
-bash-3.00$
Oracle user
-bash-3.00$ ./runcluvfy.sh stage -pre crsinst -n sol1,sol2 -verbose
Performing pre-checks for cluster services setup
Checking node reachability…
Check: Node reachability from node “sol2”
Destination Node Reachable?
———————————— ————————
sol1 yes
sol2 yes
Result: Node reachability check passed from node “sol2”
Checking user equivalence…
Check: User equivalence for user “oracle”
Node Name Comment
———————————— ————————
sol2 passed
sol1 passed
Result: User equivalence check passed for user “oracle”
Checking node connectivity…
Checking hosts config file…
Node Name Status Comment
———— ———————— ————————
sol2 passed
sol1 passed
Verification of the hosts config file successful
Interface information for node “sol2”
Name IP Address Subnet Gateway Def. Gateway HW Address MTU
—— ————— ————— ————— ————— —————– ——
e1000g0 10.0.2.16 10.0.0.0 10.0.2.16 UNKNOWN 08:00:27:C8:5A:32 1500
e1000g1 192.168.2.22 192.168.2.0 192.168.2.22 UNKNOWN 08:00:27:9F:07:27 1500
e1000g2 10.10.10.22 10.10.10.0 10.10.10.22 UNKNOWN 08:00:27:F9:E9:ED 1500
Interface information for node “sol1”
Name IP Address Subnet Gateway Def. Gateway HW Address MTU
—— ————— ————— ————— ————— —————– ——
e1000g0 10.0.2.15 10.0.0.0 10.0.2.15 UNKNOWN 08:00:27:55:88:6E 1500
e1000g1 192.168.2.21 192.168.2.0 192.168.2.21 UNKNOWN 08:00:27:1F:86:D8 1500
e1000g2 10.10.10.21 10.10.10.0 10.10.10.21 UNKNOWN 08:00:27:FE:CF:A1 1500
e1000g3 192.168.56.51 192.168.56.0 192.168.56.51 UNKNOWN 08:00:27:09:C0:56 1500
Check: Node connectivity of subnet “10.0.0.0”
Source Destination Connected?
—————————— —————————— —————-
sol2:e1000g0 sol1:e1000g0 yes
Result: Node connectivity passed for subnet “10.0.0.0” with node(s) sol2,sol1
Check: TCP connectivity of subnet “10.0.0.0”
Source Destination Connected?
—————————— —————————— —————-
sol2:10.0.2.16 sol1:10.0.2.15 passed
Result: TCP connectivity check passed for subnet “10.0.0.0”
Check: Node connectivity of subnet “192.168.2.0”
Source Destination Connected?
—————————— —————————— —————-
sol2:e1000g1 sol1:e1000g1 yes
Result: Node connectivity passed for subnet “192.168.2.0” with node(s) sol2,sol1
Check: TCP connectivity of subnet “192.168.2.0”
Source Destination Connected?
—————————— —————————— —————-
sol2:192.168.2.22 sol1:192.168.2.21 passed
Result: TCP connectivity check passed for subnet “192.168.2.0”
Check: Node connectivity of subnet “10.10.10.0”
Source Destination Connected?
—————————— —————————— —————-
sol2:e1000g2 sol1:e1000g2 yes
Result: Node connectivity passed for subnet “10.10.10.0” with node(s) sol2,sol1
Check: TCP connectivity of subnet “10.10.10.0”
Source Destination Connected?
—————————— —————————— —————-
sol2:10.10.10.22 sol1:10.10.10.21 passed
Result: TCP connectivity check passed for subnet “10.10.10.0”
Check: Node connectivity of subnet “192.168.56.0”
Result: Node connectivity passed for subnet “192.168.56.0” with node(s) sol1
Check: TCP connectivity of subnet “192.168.56.0”
Source Destination Connected?
—————————— —————————— —————-
sol2:192.168.2.22 sol1:192.168.56.51 passed
Result: TCP connectivity check passed for subnet “192.168.56.0”
Interfaces found on subnet “10.0.0.0” that are likely candidates for a private interconnect are:
sol2 e1000g0:10.0.2.16
sol1 e1000g0:10.0.2.15
Interfaces found on subnet “192.168.2.0” that are likely candidates for a private interconnect are:
sol2 e1000g1:192.168.2.22
sol1 e1000g1:192.168.2.21
Interfaces found on subnet “10.10.10.0” that are likely candidates for a private interconnect are:
sol2 e1000g2:10.10.10.22
sol1 e1000g2:10.10.10.21
WARNING:
Could not find a suitable set of interfaces for VIPs
Result: Node connectivity check passed
Check: Total memory
Node Name Available Required Comment
———— ———————— ———————— ———-
sol2 4GB (4194304.0KB) 1.5GB (1572864.0KB) passed
sol1 4GB (4194304.0KB) 1.5GB (1572864.0KB) passed
Result: Total memory check passed
Check: Available memory
Node Name Available Required Comment
———— ———————— ———————— ———-
sol2 2.7505GB (2884120.0KB) 50MB (51200.0KB) passed
sol1 2.7266GB (2859036.0KB) 50MB (51200.0KB) passed
Result: Available memory check passed
Check: Swap space
Node Name Available Required Comment
———— ———————— ———————— ———-
sol2 4.0064GB (4200992.0KB) 4GB (4194304.0KB) passed
sol1 4.0064GB (4200992.0KB) 4GB (4194304.0KB) passed
Result: Swap space check passed
Check: Free disk space for “sol2:/var/tmp/”
Path Node Name Mount point Available Required Comment
—————- ———— ———— ———— ———— ————
/var/tmp/ sol2 / 5.3015GB 1GB passed
Result: Free disk space check passed for “sol2:/var/tmp/”
Check: Free disk space for “sol1:/var/tmp/”
Path Node Name Mount point Available Required Comment
—————- ———— ———— ———— ———— ————
/var/tmp/ sol1 / 5.3016GB 1GB passed
Result: Free disk space check passed for “sol1:/var/tmp/”
Check: User existence for “oracle”
Node Name Status Comment
———— ———————— ————————
sol2 exists(1101) passed
sol1 exists(1101) passed
Checking for multiple users with UID value 1101
Result: Check for multiple users with UID value 1101 passed
Result: User existence check passed for “oracle”
Check: Group existence for “oinstall”
Node Name Status Comment
———— ———————— ————————
sol2 exists passed
sol1 exists passed
Result: Group existence check passed for “oinstall”
Check: Group existence for “dba”
Node Name Status Comment
———— ———————— ————————
sol2 exists passed
sol1 exists passed
Result: Group existence check passed for “dba”
Check: Membership of user “oracle” in group “oinstall” [as Primary]
Node Name User Exists Group Exists User in Group Primary Comment
—————- ———— ———— ———— ———— ————
sol2 yes yes yes yes passed
sol1 yes yes yes yes passed
Result: Membership check for user “oracle” in group “oinstall” [as Primary] passed
Check: Membership of user “oracle” in group “dba”
Node Name User Exists Group Exists User in Group Comment
—————- ———— ———— ———— —————-
sol2 yes yes yes passed
sol1 yes yes yes passed
Result: Membership check for user “oracle” in group “dba” passed
Check: Run level
Node Name run level Required Comment
———— ———————— ———————— ———-
sol2 3 3 passed
sol1 3 3 passed
Result: Run level check passed
Check: Hard limits for “maximum open file descriptors”
Node Name Type Available Required Comment
—————- ———— ———— ———— —————-
sol2 hard 4096 65536 failed
sol1 hard 4096 65536 failed
Result: Hard limits check failed for “maximum open file descriptors”
Check: Soft limits for “maximum open file descriptors”
Node Name Type Available Required Comment
—————- ———— ———— ———— —————-
sol2 soft 4096 1024 passed
sol1 soft 4096 1024 passed
Result: Soft limits check passed for “maximum open file descriptors”
Check: Hard limits for “maximum user processes”
Node Name Type Available Required Comment
—————- ———— ———— ———— —————-
sol2 hard 29995 16384 passed
sol1 hard 29995 16384 passed
Result: Hard limits check passed for “maximum user processes”
Check: Soft limits for “maximum user processes”
Node Name Type Available Required Comment
—————- ———— ———— ———— —————-
sol2 soft 29995 2047 passed
sol1 soft 29995 2047 passed
Result: Soft limits check passed for “maximum user processes”
Check: System architecture
Node Name Available Required Comment
———— ———————— ———————— ———-
sol2 64-bit amd64 kernel modules 64-bit amd64 kernel modules passed
sol1 64-bit amd64 kernel modules 64-bit amd64 kernel modules passed
Result: System architecture check passed
Check: Kernel version
Node Name Available Required Comment
———— ———————— ———————— ———-
sol2 5.10-2010.08.11.10.15 5.10-2008.10 passed
sol1 5.10-2010.08.11.10.15 5.10-2008.10 passed
Result: Kernel version check passed
Check: Kernel parameter for “project.max-sem-ids”
Node Name Configured Required Comment
———— ———————— ———————— ———-
sol2 128 100 passed
sol1 128 100 passed
Result: Kernel parameter check passed for “project.max-sem-ids”
Check: Kernel parameter for “process.max-sem-nsems”
Node Name Configured Required Comment
———— ———————— ———————— ———-
sol2 512 256 passed
sol1 512 256 passed
Result: Kernel parameter check passed for “process.max-sem-nsems”
Check: Kernel parameter for “project.max-shm-memory”
Node Name Configured Required Comment
———— ———————— ———————— ———-
sol2 5368709120 4294967295 passed
sol1 5368709120 4294967295 passed
Result: Kernel parameter check passed for “project.max-shm-memory”
Check: Kernel parameter for “project.max-shm-ids”
Node Name Configured Required Comment
———— ———————— ———————— ———-
sol2 128 100 passed
sol1 128 100 passed
Result: Kernel parameter check passed for “project.max-shm-ids”
Check: Package existence for “SUNWarc-…”
Node Name Available Required Comment
———— ———————— ———————— ———-
sol2 SUNWarc-11.10.0-2005.01.21.16.34 SUNWarc-… passed
sol1 SUNWarc-11.10.0-2005.01.21.16.34 SUNWarc-… passed
Result: Package existence check passed for “SUNWarc-…”
Check: Package existence for “SUNWbtool-…”
Node Name Available Required Comment
———— ———————— ———————— ———-
sol2 SUNWbtool-11.10.0-2005.01.21.16.34 SUNWbtool-… passed
sol1 SUNWbtool-11.10.0-2005.01.21.16.34 SUNWbtool-… passed
Result: Package existence check passed for “SUNWbtool-…”
Check: Package existence for “SUNWhea-…”
Node Name Available Required Comment
———— ———————— ———————— ———-
sol2 SUNWhea-11.10.0-2005.01.21.16.34 SUNWhea-… passed
sol1 SUNWhea-11.10.0-2005.01.21.16.34 SUNWhea-… passed
Result: Package existence check passed for “SUNWhea-…”
Check: Package existence for “SUNWlibm-…”
Node Name Available Required Comment
———— ———————— ———————— ———-
sol2 SUNWlibm-5.10-2004.12.18 SUNWlibm-… passed
sol1 SUNWlibm-5.10-2004.12.18 SUNWlibm-… passed
Result: Package existence check passed for “SUNWlibm-…”
Check: Package existence for “SUNWlibms-…”
Node Name Available Required Comment
———— ———————— ———————— ———-
sol2 SUNWlibms-5.10-2004.11.23 SUNWlibms-… passed
sol1 SUNWlibms-5.10-2004.11.23 SUNWlibms-… passed
Result: Package existence check passed for “SUNWlibms-…”
Check: Package existence for “SUNWsprot-…”
Node Name Available Required Comment
———— ———————— ———————— ———-
sol2 SUNWsprot-5.10-2004.12.18 SUNWsprot-… passed
sol1 SUNWsprot-5.10-2004.12.18 SUNWsprot-… passed
Result: Package existence check passed for “SUNWsprot-…”
Check: Package existence for “SUNWtoo-…”
Node Name Available Required Comment
———— ———————— ———————— ———-
sol2 SUNWtoo-11.10.0-2005.01.21.16.34 SUNWtoo-… passed
sol1 SUNWtoo-11.10.0-2005.01.21.16.34 SUNWtoo-… passed
Result: Package existence check passed for “SUNWtoo-…”
Check: Package existence for “SUNWi1of-…”
Node Name Available Required Comment
———— ———————— ———————— ———-
sol2 SUNWi1of-6.6.2.7400-0.2004.12.15 SUNWi1of-… passed
sol1 SUNWi1of-6.6.2.7400-0.2004.12.15 SUNWi1of-… passed
Result: Package existence check passed for “SUNWi1of-…”
Check: Package existence for “SUNWi15cs-…”
Node Name Available Required Comment
———— ———————— ———————— ———-
sol2 SUNWi15cs-2.0-2004.10.17.15.04 SUNWi15cs-… passed
sol1 SUNWi15cs-2.0-2004.10.17.15.04 SUNWi15cs-… passed
Result: Package existence check passed for “SUNWi15cs-…”
Check: Package existence for “SUNWxwfnt-…”
Node Name Available Required Comment
———— ———————— ———————— ———-
sol2 SUNWxwfnt-6.6.2.7400-0.2004.12.15 SUNWxwfnt-… passed
sol1 SUNWxwfnt-6.6.2.7400-0.2004.12.15 SUNWxwfnt-… passed
Result: Package existence check passed for “SUNWxwfnt-…”
Check: Package existence for “SUNWlibC-…”
Node Name Available Required Comment
———— ———————— ———————— ———-
sol2 SUNWlibC-5.10-2004.12.20 SUNWlibC-… passed
sol1 SUNWlibC-5.10-2004.12.20 SUNWlibC-… passed
Result: Package existence check passed for “SUNWlibC-…”
Check: Package existence for “SUNWcsl-…”
Node Name Available Required Comment
———— ———————— ———————— ———-
sol2 SUNWcsl-11.10.0-2005.01.21.16.34 SUNWcsl-… passed
sol1 SUNWcsl-11.10.0-2005.01.21.16.34 SUNWcsl-… passed
Result: Package existence check passed for “SUNWcsl-…”
Check: Operating system patch for “Patch 139575-03”
Node Name Applied Required Comment
———— ———————— ———————— ———-
sol2 Patch 139556-08 Patch 139575-03 passed
sol1 Patch 139556-08 Patch 139575-03 passed
Result: Operating system patch check passed for “Patch 139575-03”
Check: Operating system patch for “Patch 139556-08”
Node Name Applied Required Comment
———— ———————— ———————— ———-
sol2 Patch 139556-08 Patch 139556-08 passed
sol1 Patch 139556-08 Patch 139556-08 passed
Result: Operating system patch check passed for “Patch 139556-08”
Check: Operating system patch for “Patch 137104-02”
Node Name Applied Required Comment
———— ———————— ———————— ———-
sol2 Patch 141445-09 Patch 137104-02 passed
sol1 Patch 141445-09 Patch 137104-02 passed
Result: Operating system patch check passed for “Patch 137104-02”
Check: Operating system patch for “Patch 120754-06”
Node Name Applied Required Comment
———— ———————— ———————— ———-
sol2 Patch 120754-07 Patch 120754-06 passed
sol1 Patch 120754-07 Patch 120754-06 passed
Result: Operating system patch check passed for “Patch 120754-06”
Check: Operating system patch for “Patch 119961-05”
Node Name Applied Required Comment
———— ———————— ———————— ———-
sol2 Patch 119961-06 Patch 119961-05 passed
sol1 Patch 119961-06 Patch 119961-05 passed
Result: Operating system patch check passed for “Patch 119961-05”
Check: Operating system patch for “Patch 119964-14”
Node Name Applied Required Comment
———— ———————— ———————— ———-
sol2 Patch 119964-21 Patch 119964-14 passed
sol1 Patch 119964-21 Patch 119964-14 passed
Result: Operating system patch check passed for “Patch 119964-14”
Checking for multiple users with UID value 0
Result: Check for multiple users with UID value 0 passed
Check: Current group ID
Result: Current group ID check passed
Checking Core file name pattern consistency…
Core file name pattern consistency check passed.
Checking to make sure user “oracle” is not in “root” group
Node Name Status Comment
———— ———————— ————————
sol2 does not exist passed
sol1 does not exist passed
Result: User “oracle” is not part of “root” group. Check passed
Check default user file creation mask
Node Name Available Required Comment
———— ———————— ———————— ———-
sol2 0022 0022 passed
sol1 0022 0022 passed
Result: Default user file creation mask check passed
Starting Clock synchronization checks using Network Time Protocol(NTP)…
NTP Configuration file check started…
Network Time Protocol(NTP) configuration file not found on any of the nodes. Oracle Cluster Time Synchronization Service(CTSS) can be used instead of NTP for time synchronization on the cluster nodes
Result: Clock synchronization check using Network Time Protocol(NTP) passed
Pre-check for cluster services setup was unsuccessful on all the nodes.
-bash-3.00$
Annex B
bash-3.00# /u01/app/oraInventory/orainstRoot.sh
Changing permissions of /u01/app/oraInventory.
Adding read,write permissions for group.
Removing read,write,execute permissions for world.
Changing groupname of /u01/app/oraInventory to oinstall.
The execution of the script is complete.
bash-3.00# /u01/app/11.2.0/grid/root.sh
Running Oracle 11g root.sh script…
The following environment variables are set as:
ORACLE_OWNER= grid
ORACLE_HOME= /u01/app/11.2.0/grid
Enter the full pathname of the local bin directory: [/usr/local/bin]:
Creating /usr/local/bin directory…
Copying dbhome to /usr/local/bin …
Copying oraenv to /usr/local/bin …
Copying coraenv to /usr/local/bin …
Creating /var/opt/oracle/oratab file…
Entries will be added to the /var/opt/oracle/oratab file as needed by
Database Configuration Assistant when a database is created
Finished running generic part of root.sh script.
Now product-specific root actions will be performed.
2011-05-03 01:36:59: Parsing the host name
2011-05-03 01:36:59: Checking for super user privileges
2011-05-03 01:36:59: User has super user privileges
Using configuration parameter file: /u01/app/11.2.0/grid/crs/install/crsconfig_p arams
Creating trace directory
/export/home/grid/.bash_profile: line 18: ulimit: open files: cannot modify limi t: Not owner
LOCAL ADD MODE
Creating OCR keys for user ‘root’, privgrp ‘root’..
Operation successful.
root wallet
root wallet cert
root cert export
peer wallet
profile reader wallet
pa wallet
peer wallet keys
pa wallet keys
peer cert request
pa cert request
peer cert
pa cert
peer root cert TP
profile reader root cert TP
pa root cert TP
peer pa cert TP
pa peer cert TP
profile reader pa cert TP
profile reader peer cert TP
peer user cert
pa user cert
Adding daemon to inittab
CRS-4123: Oracle High Availability Services has been started.
ohasd is starting
CRS-2672: Attempting to start ‘ora.gipcd’ on ‘sol1’
CRS-2672: Attempting to start ‘ora.mdnsd’ on ‘sol1’
CRS-2676: Start of ‘ora.gipcd’ on ‘sol1’ succeeded
CRS-2676: Start of ‘ora.mdnsd’ on ‘sol1’ succeeded
CRS-2672: Attempting to start ‘ora.gpnpd’ on ‘sol1’
CRS-2676: Start of ‘ora.gpnpd’ on ‘sol1’ succeeded
CRS-2672: Attempting to start ‘ora.cssdmonitor’ on ‘sol1’
CRS-2676: Start of ‘ora.cssdmonitor’ on ‘sol1’ succeeded
CRS-2672: Attempting to start ‘ora.cssd’ on ‘sol1’
CRS-2672: Attempting to start ‘ora.diskmon’ on ‘sol1’
CRS-2676: Start of ‘ora.diskmon’ on ‘sol1’ succeeded
CRS-2676: Start of ‘ora.cssd’ on ‘sol1’ succeeded
CRS-2672: Attempting to start ‘ora.ctssd’ on ‘sol1’
CRS-2676: Start of ‘ora.ctssd’ on ‘sol1’ succeeded
ASM created and started successfully.
DiskGroup DATA created successfully.
clscfg: -install mode specified
Successfully accumulated necessary OCR keys.
Creating OCR keys for user ‘root’, privgrp ‘root’..
Operation successful.
CRS-2672: Attempting to start ‘ora.crsd’ on ‘sol1’
CRS-2676: Start of ‘ora.crsd’ on ‘sol1’ succeeded
CRS-4256: Updating the profile
Successful addition of voting disk 1d4fe36ed15a4f00bf1d7ef9e38ce694.
Successfully replaced voting disk group with +DATA.
CRS-4256: Updating the profile
CRS-4266: Voting file(s) successfully replaced
## STATE File Universal Id File Name Disk group
— —– —————– ——— ———
1. ONLINE 1d4fe36ed15a4f00bf1d7ef9e38ce694 (/dev/rdsk/c1t10d0s0) [DATA]
Located 1 voting disk(s).
CRS-2673: Attempting to stop ‘ora.crsd’ on ‘sol1’
CRS-2675: Stop of ‘ora.crsd’ on ‘sol1’ failed
CRS-2679: Attempting to clean ‘ora.crsd’ on ‘sol1’
CRS-2681: Clean of ‘ora.crsd’ on ‘sol1’ succeeded
CRS-2673: Attempting to stop ‘ora.asm’ on ‘sol1’
CRS-2677: Stop of ‘ora.asm’ on ‘sol1’ succeeded
CRS-2673: Attempting to stop ‘ora.ctssd’ on ‘sol1’
CRS-2677: Stop of ‘ora.ctssd’ on ‘sol1’ succeeded
CRS-2673: Attempting to stop ‘ora.cssdmonitor’ on ‘sol1’
CRS-2677: Stop of ‘ora.cssdmonitor’ on ‘sol1’ succeeded
CRS-2673: Attempting to stop ‘ora.cssd’ on ‘sol1’
CRS-2677: Stop of ‘ora.cssd’ on ‘sol1’ succeeded
CRS-2673: Attempting to stop ‘ora.gpnpd’ on ‘sol1’
CRS-2675: Stop of ‘ora.gpnpd’ on ‘sol1’ failed
CRS-2679: Attempting to clean ‘ora.gpnpd’ on ‘sol1’
CRS-2681: Clean of ‘ora.gpnpd’ on ‘sol1’ succeeded
CRS-2673: Attempting to stop ‘ora.gipcd’ on ‘sol1’
CRS-2677: Stop of ‘ora.gipcd’ on ‘sol1’ succeeded
CRS-2673: Attempting to stop ‘ora.mdnsd’ on ‘sol1’
CRS-2677: Stop of ‘ora.mdnsd’ on ‘sol1’ succeeded
CRS-2672: Attempting to start ‘ora.mdnsd’ on ‘sol1’
CRS-2676: Start of ‘ora.mdnsd’ on ‘sol1’ succeeded
CRS-2672: Attempting to start ‘ora.gipcd’ on ‘sol1’
CRS-2676: Start of ‘ora.gipcd’ on ‘sol1’ succeeded
CRS-2672: Attempting to start ‘ora.gpnpd’ on ‘sol1’
CRS-2676: Start of ‘ora.gpnpd’ on ‘sol1’ succeeded
CRS-2672: Attempting to start ‘ora.cssdmonitor’ on ‘sol1’
CRS-2676: Start of ‘ora.cssdmonitor’ on ‘sol1’ succeeded
CRS-2672: Attempting to start ‘ora.cssd’ on ‘sol1’
CRS-2672: Attempting to start ‘ora.diskmon’ on ‘sol1’
CRS-2676: Start of ‘ora.diskmon’ on ‘sol1’ succeeded
CRS-2676: Start of ‘ora.cssd’ on ‘sol1’ succeeded
CRS-2672: Attempting to start ‘ora.ctssd’ on ‘sol1’
CRS-2676: Start of ‘ora.ctssd’ on ‘sol1’ succeeded
CRS-2672: Attempting to start ‘ora.asm’ on ‘sol1’
CRS-2676: Start of ‘ora.asm’ on ‘sol1’ succeeded
CRS-2672: Attempting to start ‘ora.crsd’ on ‘sol1’
CRS-2676: Start of ‘ora.crsd’ on ‘sol1’ succeeded
CRS-2672: Attempting to start ‘ora.evmd’ on ‘sol1’
CRS-2676: Start of ‘ora.evmd’ on ‘sol1’ succeeded
CRS-2672: Attempting to start ‘ora.asm’ on ‘sol1’
CRS-2676: Start of ‘ora.asm’ on ‘sol1’ succeeded
CRS-2672: Attempting to start ‘ora.DATA.dg’ on ‘sol1’
CRS-2676: Start of ‘ora.DATA.dg’ on ‘sol1’ succeeded
sol1 2011/05/03 01:42:14 /u01/app/11.2.0/grid/cdata/sol1/backup_20110503_014214.olr
Configure Oracle Grid Infrastructure for a Cluster … succeeded
Updating inventory properties for clusterware
Starting Oracle Universal Installer…
Checking swap space: must be greater than 500 MB. Actual 6708 MB Passed
The inventory pointer is located at /var/opt/oracle/oraInst.loc
The inventory is located at /u01/app/oraInventory
‘UpdateNodeList’ was successful.
bash-3.00#
# ./root.sh
Running Oracle 11g root.sh script…
The following environment variables are set as:
ORACLE_OWNER= grid
ORACLE_HOME= /u01/app/11.2.0/grid
Enter the full pathname of the local bin directory: [/usr/local/bin]:
Creating /usr/local/bin directory…
Copying dbhome to /usr/local/bin …
Copying oraenv to /usr/local/bin …
Copying coraenv to /usr/local/bin …
Creating /var/opt/oracle/oratab file…
Entries will be added to the /var/opt/oracle/oratab file as needed by
Database Configuration Assistant when a database is created
Finished running generic part of root.sh script.
Now product-specific root actions will be performed.
2011-05-03 01:48:25: Parsing the host name
2011-05-03 01:48:25: Checking for super user privileges
2011-05-03 01:48:25: User has super user privileges
Using configuration parameter file: /u01/app/11.2.0/grid/crs/install/crsconfig_params
Creating trace directory
/export/home/grid/.bash_profile: line 18: ulimit: open files: cannot modify limit: Not owner
LOCAL ADD MODE
Creating OCR keys for user ‘root’, privgrp ‘root’..
Operation successful.
Adding daemon to inittab
CRS-4123: Oracle High Availability Services has been started.
ohasd is starting
CRS-4402: The CSS daemon was started in exclusive mode but found an active CSS daemon on node sol1, number 1, and is terminating
An active cluster was found during exclusive startup, restarting to join the cluster
CRS-2672: Attempting to start ‘ora.mdnsd’ on ‘sol2’
CRS-2676: Start of ‘ora.mdnsd’ on ‘sol2’ succeeded
CRS-2672: Attempting to start ‘ora.gipcd’ on ‘sol2’
CRS-2676: Start of ‘ora.gipcd’ on ‘sol2’ succeeded
CRS-2672: Attempting to start ‘ora.gpnpd’ on ‘sol2’
CRS-2676: Start of ‘ora.gpnpd’ on ‘sol2’ succeeded
CRS-2672: Attempting to start ‘ora.cssdmonitor’ on ‘sol2’
CRS-2676: Start of ‘ora.cssdmonitor’ on ‘sol2’ succeeded
CRS-2672: Attempting to start ‘ora.cssd’ on ‘sol2’
CRS-2672: Attempting to start ‘ora.diskmon’ on ‘sol2’
CRS-2676: Start of ‘ora.diskmon’ on ‘sol2’ succeeded
CRS-2676: Start of ‘ora.cssd’ on ‘sol2’ succeeded
CRS-2672: Attempting to start ‘ora.ctssd’ on ‘sol2’
CRS-2676: Start of ‘ora.ctssd’ on ‘sol2’ succeeded
CRS-2672: Attempting to start ‘ora.asm’ on ‘sol2’
CRS-2676: Start of ‘ora.asm’ on ‘sol2’ succeeded
CRS-2672: Attempting to start ‘ora.crsd’ on ‘sol2’
CRS-2676: Start of ‘ora.crsd’ on ‘sol2’ succeeded
CRS-2672: Attempting to start ‘ora.evmd’ on ‘sol2’
CRS-2676: Start of ‘ora.evmd’ on ‘sol2’ succeeded
sol2 2011/05/03 01:51:44 /u01/app/11.2.0/grid/cdata/sol2/backup_20110503_015144.olr
Configure Oracle Grid Infrastructure for a Cluster … succeeded
Updating inventory properties for clusterware
Starting Oracle Universal Installer…
Checking swap space: must be greater than 500 MB. Actual 6745 MB Passed
The inventory pointer is located at /var/opt/oracle/oraInst.loc
The inventory is located at /u01/app/oraInventory
#
13 Comments »
Leave a comment
-
OraNA


-
Archives
- February 2017 (1)
- November 2016 (1)
- October 2016 (1)
- May 2016 (2)
- March 2016 (3)
- December 2014 (2)
- July 2014 (1)
- June 2014 (6)
- May 2014 (5)
- February 2014 (1)
- December 2012 (2)
- November 2012 (8)
-
Categories
-
RSS
Entries RSS
Comments RSS

[…] will be upgraded using dbua. The configuration is a two node Solaris 10 x86-64 cluster described here. For Linux based upgrade to Oracle 11.2.0.2 from Oracle 11.2.0.1click […]
[…] An overview to Oracle Virtualization solutions can be seen here. You can see how to use Oracle VM VirtualBox to build a two node Solaris cluster here. […]
Hi,
Did IP address of sol1-vip/sol2-vip automatic create after finished installation ?
In my lab, it not show when using ‘ifconfig -a’ command.
Thanks,
Su
Hello Su,
After GI installation you should have the VIP accessible and visible.
Regards,
Hello Su,
If the installation has completed succesfully what is the status of the resources?
crsctl stat res -t
Regards,
[…] can be seen here. You can see how to use Oracle VM VirtualBox to build a two node Solaris cluster here. For information related to building a RAC 11gR2 cluster on OEL without GNS click […]
[…] can be seen here. You can see how to use Oracle VM VirtualBox to build a two node Solaris cluster here. For information related to building a RAC 11gR2 cluster on OEL without GNS click […]
[…] can be seen here. You can see how to use Oracle VM VirtualBox to build a two node Solaris cluster here. For information related to building a RAC 11gR2 cluster on OEL without GNS click […]
Hey there, You have done an excellent job. I will definitely digg it and individually recommend to my friends. I am confident they’ll be benefited from this website.
certainly like your website however you need to take a look at the spelling on several of your posts. A number of them are rife with spelling issues and I find it very troublesome to inform the reality however I’ll certainly come again again.
[…] about a similar two node Oracle RAC 11.2 setup on Solaris 10 x86-64 using VirtualBox click here. The article will emphasize on the Solaris 11 management options and configurations required to […]
[…] about a similar two node Oracle RAC 11.2 setup on Solaris 10 x86-64 using VirtualBox click here. The article will emphasize on the Solaris 11 management options and configurations required to […]
Pingback by Building 11gr2 RAC on Solaris 11 using VirtualBox « | February 8, 2012 |
Hey ! I loved the points , Does anyone know if my assistant might be able to access a sample IRS 1040 – Schedule D document to use ?